In this article, I am gonna show you how you can add a sticky Floating Sidebar Ad to your Blogger website. Just follow the simple steps and you will be able to add a similar ad to your website.
Sticky ads help us increase the Click Through rate (CTR) and Give better impressions and earning in Adsense. Earlier I covered How to add a Sticky footer Ad in Blogger which stick at the bottom of the screen. But, this one will stick on the two sides of the desktop screen when the user scrolls down the page.
Steps to Add Sticky Floating Sidebar Ad on Blogger:
So, Let’s open the Blogger dashboard and Go to the theme section.
Now you need to take a backup of your theme before making any changes to your theme code.
Now you need to select the Edit HTML option from the drop-down menu and simply scroll down to the end of your Theme code.
Here, You need to search for the </body> tag and paste the code just above it.
<b:if cond='data:blog.isMobileRequest == "false"'>
<b:if cond='data:blog.pageType == "item"'>
<style scoped='' type='text/css'>
.fixed-leftSd,.fixed-rightSd{position:fixed;top:80px;width:120px;height:600px; margin: 15px; z-index:9999;transform:translateZ(0)}
.fixed-leftSd{left:0}
.fixed-rightSd{right:0}
.close-fixedSd{position:absolute;width:120px;height:21px;line-height:15px;font-size:11px;font-weight:400;top:-20px;left:0;text-align:center;background:#e0e0e0;color:#666;padding:5px 0;cursor:pointer}
@media screen and (max-width:1300px){.fixed-leftSd,.fixed-rightSd{display:none;visibility:hidden;}}
</style>
<div class='fixed-leftSd'>
<div aria-label='Close Ads' class='close-fixedSd' onclick='this.parentElement.style.display="none"' role='button' tabindex='0'>
<b>CLOSE ADS</b>
</div>
<!-- 1st Ad code here -->
<ins class='adsbygoogle' data-ad-client='ca-pub-xxxxxxxx' data-ad-format='auto' data-ad-slot='xxxxxxxx' data-full-width-responsive='true' style='display:block'/>
<script>
(adsbygoogle = window.adsbygoogle || []).push({});
</script>
</div>
<div class='fixed-rightSd'>
<div aria-label='Close Ads' class='close-fixedSd' onclick='this.parentElement.style.display="none"' role='button' tabindex='0'>
<b>CLOSE ADS</b>
</div>
<!-- 2nd Ad code here -->
<ins class='adsbygoogle' data-ad-client='ca-pub-xxxxxxxxxx' data-ad-format='auto' data-ad-slot='xxxxxxxx' data-full-width-responsive='true' style='display:block'/>
<script>
(adsbygoogle = window.adsbygoogle || []).push({});
</script>
</div>
</b:if>
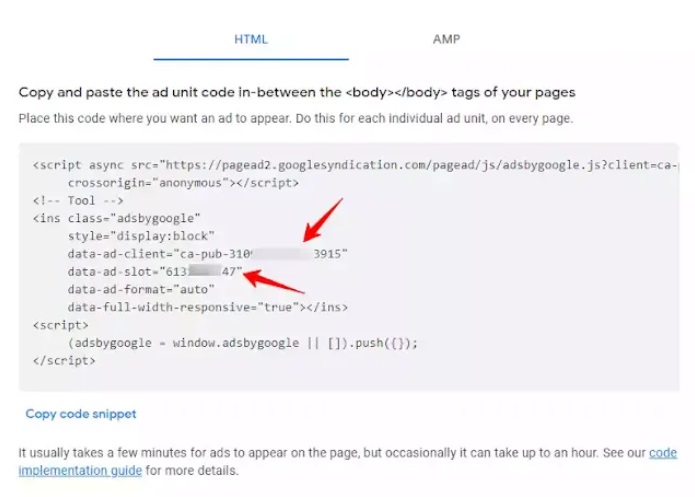
</b:if> Here, Note that you need to change two values. One is your Adsense publisher Id and the 2nd one is the Ad slot code of your responsive display ad unit.
How can You get the publisher Id and Ad slot code?
- Well, for this you need to log in to your Adsense dashboard and click on the Ads section in the left menu.
- Now you need to click on the “By Ad unit” from the top and create a New display ad unit with responsive settings on.
- After that, you will see the Publisher Id and Data ad slot code in the code generated in AdSense.
Now, Open any post page and check if the ads are showing properly or not.
I hope you have successfully added the sticky Floating sidebar ad to your Blogger website. If you found this Article, helpful do us a favor by sharing it on social media. Don’t forget to tag us on that post.
")


VIP")
VIP")
VIP")
VIP")
![BigMediumSmall – TOKYO BACK ALLEYS [UE Version]](https://gfx-station.com/wp-content/uploads/2023/12/FtyF9Cv-300x201.webp)