The Sticky notification bar on the website helps us boost the conversion to important pages and you can easily redirect your visitors to your social media accounts. You can also display special offers for your website visitors.
It will stick to your website either at the top or bottom and is easily dismissable by the users. And the best part is that you can easily use this on your blogger website by following this guide.
This floating notification widget comprises simple HTML and CSS codes and doesn’t include any external libraries which is the main cause of slow loading speed.
So, you don’t have to worry about page speed after using this code.
How To Add A Sticky Notification Bar In Blogger:
To add the sticky floating notification bar in Blogger you need to follow the below steps.
Step-1: Go to the Blogger dashboard and open the theme section.
Step-2: Now click on the drop-down menu and take a backup of your theme.
Step-3: After that click on the edit html section and search for the tag.
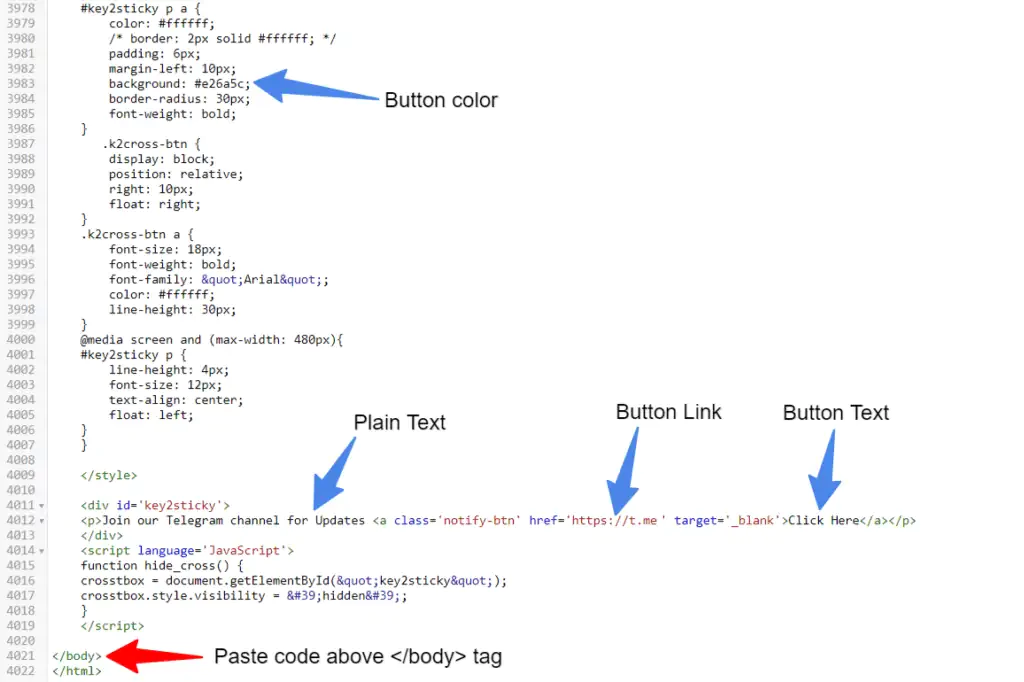
Step-4: Now paste the below code just above this code.
<style type='text/css'>
    #key2sticky {
        background: #162536;
        color: #fff;
        text-align: center;
        margin: 0 auto;
        border-top: 3px solid #E26A5C;
        height: 35px;
        font-size: 16px;
        position: fixed;
        top: 0;
        z-index: 999;
        width: 100%;
        /*border-top-left-radius: 10px; */
       /* border-top-right-radius: 10px; */
        display: flex;
        /* font-weight: bold; */
        /* font-family: "Arial"; */
        font-color: #fff;
        flex-wrap: wrap;
        justify-content: center;
        align-items: center;
        padding: 7px 0px 7px 0px;
    }
    #key2sticky:hover {background:#111;}
    #key2sticky p {
        line-height: 5px;
        font-size: 15px;
        text-align: center;
        width: 95%;
        float: left;
    }
    #key2sticky p a {
        color: #ffffff;
        /* border: 2px solid #ffffff; */
        padding: 6px;
        margin-left: 10px;
        background: #e26a5c;
        border-radius: 30px;
        font-weight: bold;
    }
       .k2cross-btn {
        display: block;
        position: relative;
        right: 10px;
        float: right;
    }
    .k2cross-btn a {
        font-size: 18px;
        font-weight: bold;
        /* font-family: "Arial"; */
        color: #ffffff;
        line-height: 30px;
    }
    @media screen and (max-width: 480px){
    #key2sticky p {
        line-height: 4px;
        font-size: 12px;
        text-align: center;
        float: left;
    }
    }

    </style>

    <div id='key2sticky'>
    <p>Join our Telegram channel for Updates <a href='https://t.me' target='_blank'>Click Here</a></p> <div class='k2cross-btn'><a href='javascript:hide_cross();'>X</a></div>
    </div>
    <script>
    function hide_cross() {
    crosstbox = document.getElementById("key2sticky");
    crosstbox.style.visibility = 'hidden';
    }
    </script>
step-5: After that modify the display text, button text, and link and save the code.
Now your floating notification bar will be added to your blogger website.
You can now further customize it according to your choice. like you can shift this notification bar to the top or bottom and it will stick in that position.
You can also change the background color, text color, button color, and the width and height of the notification bar. Just follow the methods as shown in the above video.
I hope you have successfully added the sticky notification bar to your Blogger website.


VIP")
VIP")
VIP")
VIP")
![BigMediumSmall – TOKYO BACK ALLEYS [UE Version]](https://gfx-station.com/wp-content/uploads/2023/12/FtyF9Cv-300x201.webp)